
To replace your vacuum power cord yourself, first unplug the vacuum and verify the power is off. Remove the casing screws carefully and locate the damaged cord connected to the switch and motor. Take photos if needed, then disconnect the old cord by loosening terminal screws. Attach the new cord securely, ensuring all wires are tightly connected and grounded if required. Reassemble the vacuum and test it—if you’re curious about the detailed steps, continue to explore how to do it safely and correctly.
Key Takeaways
- Unplug the vacuum and remove the casing screws carefully to access the internal wiring.
- Note and photograph the existing wiring connections before disconnecting the old cord.
- Strip the insulation from the new power cord’s wires and connect them securely to the switch and motor terminals.
- Ensure all connections are tight and properly insulated before reassembling the vacuum casing.
- Plug in the vacuum and test its operation to confirm the new cord is installed correctly and safely.
If your vacuum cleaner’s power cord is damaged or frayed, replacing it is a straightforward way to restore safety and functionality. Before you start, it’s crucial to prioritize safety precautions to avoid injury or further damage. Always unplug the vacuum from the electrical outlet before handling any internal components, even if the cord appears only slightly damaged. Wear insulated gloves if available, and work in a well-lit, dry area to prevent accidental shocks. Taking these safety precautions ensures you’re protected throughout the process.
Prioritize safety: unplug, wear gloves, and work in a dry area when replacing a damaged vacuum cord.
To begin, gather the tools required for this repair. Usually, you’ll need a screwdriver (Phillips or flat-head, depending on your vacuum model), wire strippers, pliers, and possibly a soldering iron if you plan to make more secure connections. Having these tools ready will streamline the process and avoid unnecessary trips to the toolbox in the middle of the repair. Make sure you also have a replacement power cord that matches your vacuum’s specifications, especially regarding voltage and connector type. Check the user manual or look for labels on the existing cord to confirm compatibility.
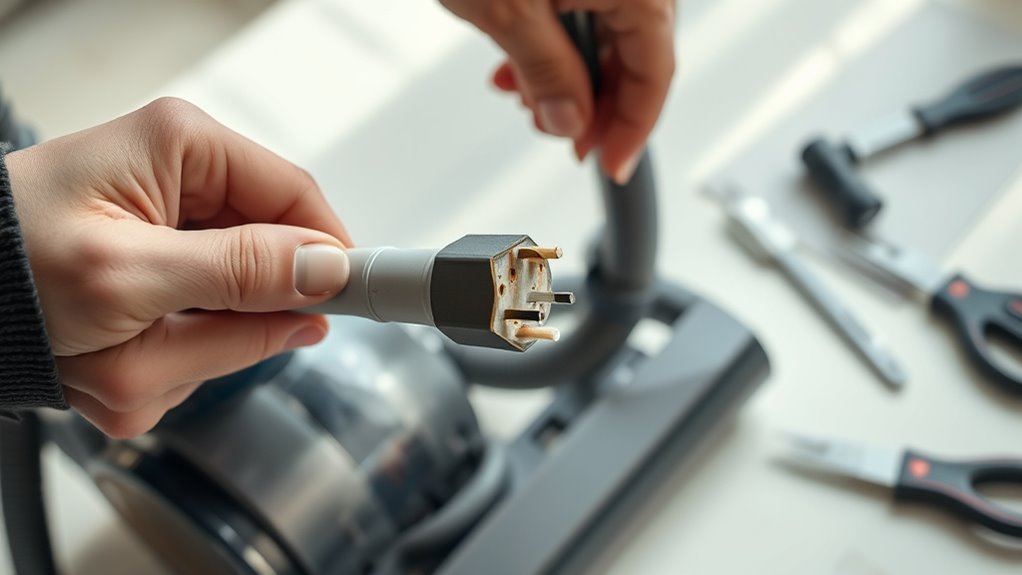
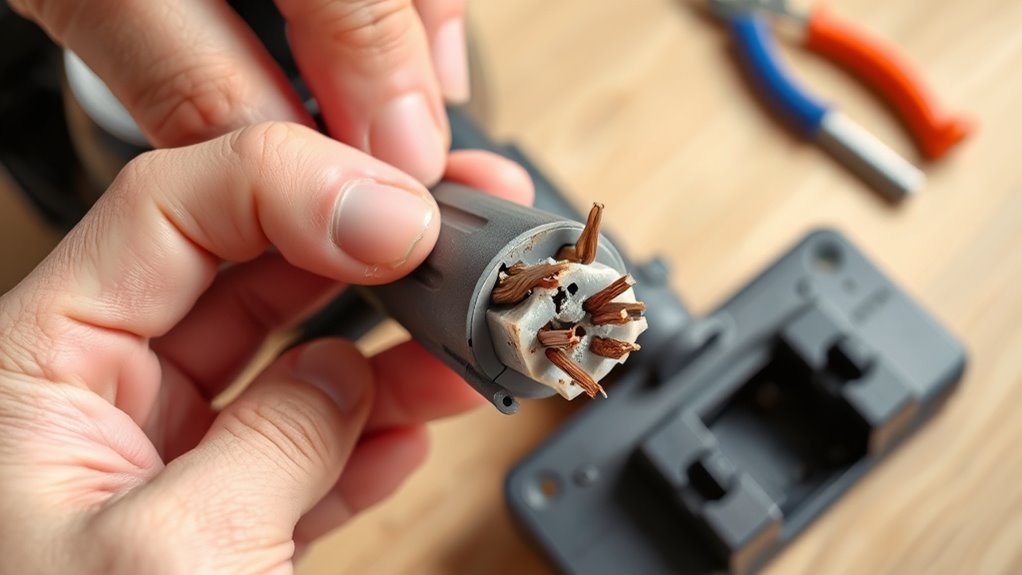
Once you’ve prepared your workspace and assembled your tools, carefully remove the vacuum’s casing. Most models have screws securing the cover; unscrew these and set them aside. Be gentle to avoid cracking plastic parts. With the casing removed, locate the damaged power cord connected to the switch and motor terminals. Take note of how the wires are connected—taking a photo can be helpful for reassembly. Carefully disconnect the worn-out cord by loosening any terminal screws or clips holding it in place. Use your pliers if needed, but avoid pulling wires forcefully.
Next, prepare your new power cord by stripping the insulation at the ends, exposing enough wire to connect securely. Follow the original wiring connections carefully, attaching the new cord to the switch and motor terminals. Tighten terminal screws securely, ensuring there are no loose strands that could cause shorts. If your cord has a grounding wire, make sure to connect it to the ground terminal or grounding screw. Once everything is connected properly, double-check your work to confirm all connections are tight and correct. Additionally, verify the safety standards of the new cord to ensure safe operation.
Finally, reassemble the vacuum by replacing the casing and screws. Before plugging it in, inspect your work for any loose wires or tools left inside. When you’re confident everything is in order, plug the vacuum into an outlet and turn it on to test the repair. If it runs smoothly without sparks or unusual noises, you’ve successfully replaced the power cord without calling a technician. Remember, taking your time and following safety precautions are key to a successful, safe repair.

36ft Vacuum Cleaner Power Cord & 1-Pack HEPA Filters Combo Kit for Shark Rotator Pro Lift-Away NV500 NV501 NV502 NV552 Upright Vacuum Extension Cord
36-foot extended power cord covers a larger cleaning area and reduces the hassle of plugging and unplugging, making…
As an affiliate, we earn on qualifying purchases.
As an affiliate, we earn on qualifying purchases.
Frequently Asked Questions
Can I Use Any Replacement Cord for My Vacuum?
You might wonder if any replacement cord works for your vacuum. It’s essential to verify cord compatibility first—use a cord with the same voltage, amperage, and plug type. Never compromise safety; always follow safety precautions when replacing the cord. Using an incompatible or faulty cord can cause damage or hazards. Ensure you match the specifications and quality of the original cord to keep your vacuum running safely and efficiently.
How Do I Identify the Correct Replacement Cord?
Like a trusty sidekick, identifying the correct replacement cord guarantees smooth operation. To do this, check your vacuum’s model number and compare it with the cord specifications, focusing on cord compatibility. Look for the same plug type, voltage, and amperage. Always follow safety precautions—disconnect power before working. If unsure, consult your vacuum’s manual or manufacturer’s website. Properly matched cords prevent damage and keep you safe.
Is It Safe to Replace the Cord Myself?
Replacing a vacuum power cord yourself can be safe if you prioritize electrical safety and tool safety. Make sure the vacuum is unplugged before starting, and use insulated tools to prevent shocks. Follow the proper steps to avoid damaging the appliance or injuring yourself. If you’re comfortable with electrical work and follow safety guidelines, you can do it securely. Otherwise, consulting a professional ensures your safety and proper repair.
What Tools Are Needed for Replacing the Power Cord?
Replacing a power cord is like giving your vacuum a fresh set of shoes. To do it safely, you’ll need a screwdriver, wire strippers, and a new power cord. Make sure to follow safety precautions, unplug the vacuum first, and disconnect the old cord carefully. Troubleshooting tips include checking for secure connections and inspecting for damage. With these tools and precautions, you can confidently handle the replacement yourself.
How Long Does the Replacement Process Typically Take?
Replacing a vacuum power cord usually takes about 30 minutes, but this depends on your DIY safety skills and experience. You should carefully follow safety precautions, such as unplugging the vacuum and working in a dry area. The replacement timeline can be shorter if you’re familiar with electrical work, but rushing might cause errors. Take your time, double-check your connections, and guarantee safety to complete the process efficiently and safely.

Cooper Wiring 183BKBX Non-Grounding Rubber Straight Blade Plug
Black rubber plug
As an affiliate, we earn on qualifying purchases.
As an affiliate, we earn on qualifying purchases.
Conclusion
Replacing your vacuum power cord yourself saves you time and money. With over 60% of appliance repairs being DIY-friendly, you’re more capable than you think. Just follow these simple steps, stay safe, and you’ll have your vacuum up and running in no time. Remember, tackling small repairs like this boosts your confidence and keeps your home appliances working smoothly longer. So, give it a try—you might be surprised how easy it is to handle repairs on your own!

36ft Upright Vacuum Cleaner Replacement Cord for Shark Bissell Hoover Electrolux Eureka Sanitaire Kenmore AC Gray Extension Cord
Widely used: for Shark Rotator Lift-up NV501 NV502 NV450 NV402 NV341 Upright Vacuum Cleaners; Shark Rotator NV400, NV500…
As an affiliate, we earn on qualifying purchases.
As an affiliate, we earn on qualifying purchases.

Vacuum Connector Assortment 113 PCS Heat Resistance 240℃(460℉)Automotive Vacuum Tubing Connector Vacuum Tee Connector Assortment Kit Black Nylon
【Range of Application】Nylon 66 vacuum connector professional for automotive vacuum hose connect, use in three places on the…
As an affiliate, we earn on qualifying purchases.
As an affiliate, we earn on qualifying purchases.