
To clear a clogged vacuum hose in 10 minutes, start by unplugging your vacuum for safety. Detach the hose carefully, then inspect it for visible obstructions like hair, string, or debris. Use your hands or a flexible tool to dislodge any buildup, and run warm water through the hose if debris persists. Dry it thoroughly before reattachment. For more tips to keep your vacuum running smoothly, keep exploring proven methods.
Key Takeaways
- Unplug the vacuum and locate the hose attachment to ensure safety before inspection.
- Carefully remove the hose and visually check for hair, debris, or blockages inside.
- Use a flexible tool or your hands to dislodge and clear any visible obstructions gently.
- Run warm water through the hose to remove stubborn debris, then dry completely before reattaching.
- Reconnect the hose, test for proper airflow and suction, and replace if damage persists.

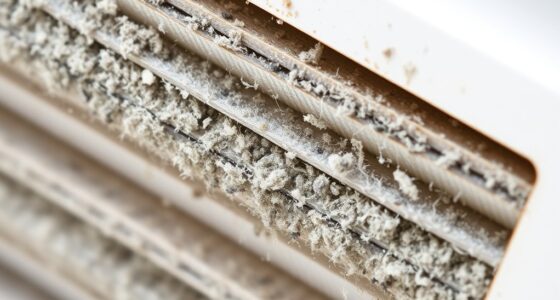
A clogged vacuum hose can substantially reduce your vacuum’s performance, making cleaning tasks frustrating. When airflow is restricted, your vacuum struggles to pick up dirt and debris efficiently, leading to longer cleaning times and less effective results. The key to maintaining your vacuum’s ideal function is proper vacuum maintenance, which includes checking and clearing clogs regularly. If you notice a sudden drop in suction power or the vacuum isn’t picking up debris as it should, the hose may be blocked. Luckily, clearing a clog usually takes just a few minutes, and with the right approach, you can restore your vacuum’s performance quickly.
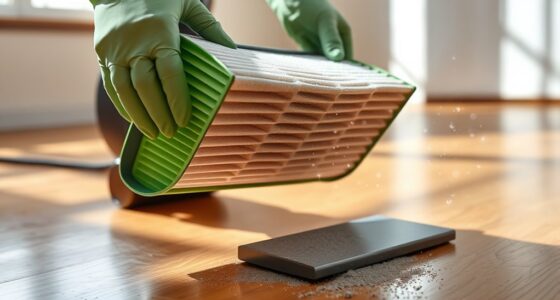
First, unplug the vacuum to guarantee safety before working on it. Locate the hose, which is typically attached to the main body of your vacuum. Remove it carefully, following your manufacturer’s instructions if necessary. Once detached, examine the hose for visible obstructions like hair, string, or accumulated debris. Often, a clog is caused by tangled hair or a buildup of dust, which can be easily removed. To clear the blockage, use your hands or a long, flexible tool like a broomstick or a straightened coat hanger to gently dislodge any debris inside. Be cautious not to puncture or damage the hose. If the clog is stubborn, run warm water through the hose to loosen dirt and debris, but make sure to dry it completely before reattaching it to prevent mold or mildew growth. Additionally, understanding the role of airflow in vacuum efficiency can help you identify issues more quickly.
If you find that cleaning the hose doesn’t restore suction or the hose is damaged, it’s time for hose replacement. Replacing the hose is a straightforward process—you can usually find compatible replacement hoses online or at your local hardware store. Make sure to choose the correct size and model to guarantee a proper fit. Installing the new hose involves simply attaching it to the designated ports, making sure it clicks or fits securely into place. After the replacement, test your vacuum to confirm that airflow has improved and suction power is restored.
Regular vacuum maintenance, including inspecting and replacing hoses when needed, can prevent more serious issues down the line. Keeping your vacuum in good shape not only extends its lifespan but also makes your cleaning routine more efficient. With just a few quick steps—checking for clogs, clearing or replacing the hose—you’ll have your vacuum operating at peak performance again in no time. Remember, a well-maintained vacuum makes your cleaning less of a chore and ensures your home stays clean and fresh.
Frequently Asked Questions
Can I Use a Wire Hanger to Clear the Hose?
Using a wire hanger might seem like a quick fix, but it’s not always the best idea. It’s an alternative tool for DIY methods, but it can damage your vacuum hose or push debris further in. Instead, try a long, flexible brush or a straightened coat hanger carefully. This way, you clear the clog without risking harm, making your cleaning process safer and more effective.
What Tools Are Safest for Unclogging a Vacuum Hose?
When it comes to hose maintenance, safety precautions are essential. Use a long, flexible brush or a broomstick to gently dislodge clogs—these tools are safe and effective. Avoid sharp objects or metal tools that could damage the hose. Always unplug your vacuum before starting, and wear gloves to protect your hands. This approach guarantees you unclog your hose safely without risking damage or injury.
How Often Should I Check for Hose Clogs?
Think of your vacuum hose as the arteries of your cleaning machine. You should perform a hose inspection regularly, ideally once a month, to catch blockages early. Incorporate this check into your maintenance schedule to keep everything flowing smoothly. Ignoring it could lead to decreased suction and more extensive repairs later. Staying proactive guarantees your vacuum remains efficient and ready whenever you need it.
Are There Specific Vacuums More Prone to Hose Clogs?
Some vacuum brands and hose materials are more prone to clogs. For example, cheaper plastic hoses or those with narrow diameters tend to clog more easily. If you have a vacuum with a flexible rubber hose or a high-quality brand, you might experience fewer issues. Regularly inspecting and maintaining your hose can prevent frequent clogs, especially if you notice your vacuum struggles with suction or if debris gets stuck easily.
What Signs Indicate a Hose Needs Cleaning Beyond Clogging?
Imagine your vacuum’s hose as its lifeline—when airflow reduces beyond normal, it signals trouble. You might notice decreased suction power, strange noises, or even hose damage like cracks or bulges. These signs show the hose isn’t just clogged but struggling to breathe, risking further damage. Regularly inspecting for airflow reduction and hose damage helps keep your vacuum running smoothly, preventing bigger issues down the line.
Conclusion
Keeping your vacuum hose clean is quick and easy, saving you time and money. Did you know that a clogged vacuum hose can reduce suction power by up to 70%? By following these simple steps, you’ll restore your vacuum’s performance in just 10 minutes. Regular maintenance not only prolongs your appliance’s lifespan but also keeps your home cleaner. So, don’t wait—service that hose today and enjoy a more powerful, efficient clean every time!